Here we are at the final chapter of the series about Node.js. In the previous section, we have gone through what Node.js is, how to build a RESTful API, and how to give it an appealing interface. Now, we are ready to dive into the world of Node CLI (Command Line Interface) development.

What is a CLI? Why build one?
A CLI is an old-fashioned command line interface: It is a program that allows users to type text commands instructing the computer to do specific tasks, as you see hackers doing in sci-fi movies. You have no limits: you can use a CLI to run programs, manage computer files and interact with the computer. A CLI differs from a graphical user interface (GUI), which uses icons, menus and windows to perform actions with a mouse or a keyboard.
CLI was the only way to interact with computers in the 1960s, using only computer terminals. In the 1970s and 1980s, CLI was commonly used by Unix and PC systems like MS-DOS and Apple DOS. But today, with graphical user interfaces (GUI), most users never use CLI.
But if you are reading this, you are not one of the “most users” but a developer. You can’t argue that CLI delivers faster performances, lower resource use, high flexibility and stability for many operations. For instance, when you need to automate a repetitive or complex task, such as backing up files, installing software, or configuring settings. You can write a script or batch file containing a series of commands and run it with a single command in the CLI.
Also our Server application may need a Node CLI, here’s how to implement it:
Hand’s down to the code of the Node CLI.
So let’s jump into the code, and as usual, my recommendation is to follow along with the repository to go through every detail.

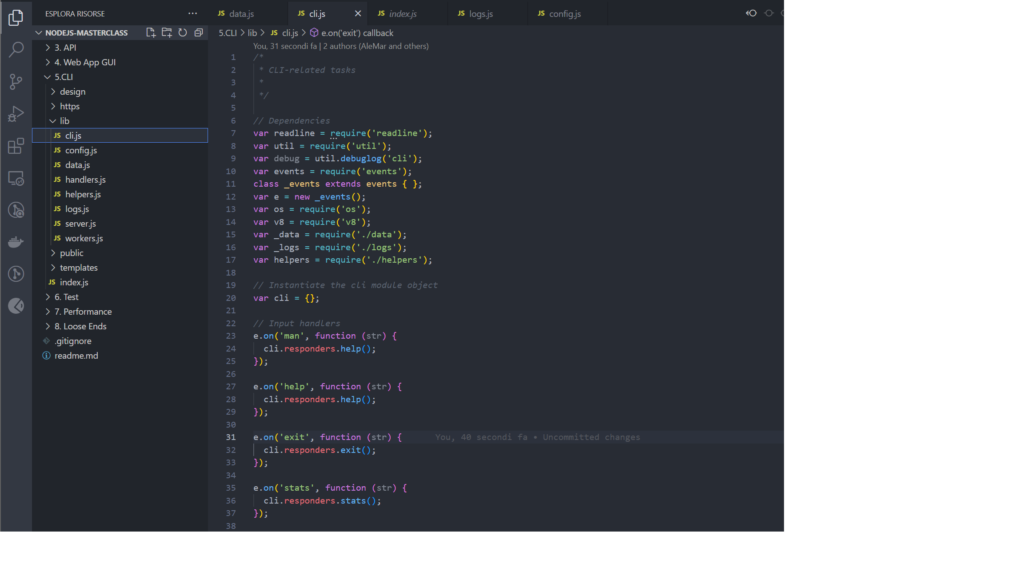
To build the CLI interface, we have added a cli.js file in our lib folder, as in the image. It is started by adding cli.init() in the index.js, our starting point of the server. cli.init() then contains the call to all the other methods of the file cli.js.
The dependencies are the following:
// Dependencies
var readline = require('readline');
var util = require('util');
var debug = util.debuglog('cli');
var events = require('events');
class _events extends events {};
var e = new _events();
var os = require('os'); // It gives information about our server
var v8 = require('v8'); // It gives information about our server
var _data = require('./data'); // To return data stored in the server
var _logs = require('./logs'); // To return logs stored in the server
var helpers = require('./helpers');
Routing
Once cli.init() is called.
- It then creates an interface using the
readlinemodule, which allows reading and writing from your terminal’s standard input and output streams. - It calls the
promptmethod on the interface to display the prompt and wait for user input. - It attaches an event listener to the line event on the interface, which fires when the user enters a line of input. It passes the input string to another function called
cli. processing, which handles the logic of the CLI commands. Then it calls the prompt method again to display the following prompt. - It attaches another event listener to the close event on the interface, triggered when the user exits the CLI by pressing Ctrl+C or Ctrl+D. It calls the process.exit method with a code of 0, which terminates the Node process gracefully.
cli. ‘processing is responsible for routing the string to the proper handler: it checks if the string is valid and non-empty and trims any whitespace from both ends. If not, it sets the string to false. It then defines an array of unique strings that identify the commands the CLI can handle, such as ‘man’, ‘help’, ‘exit’, etc. It then compares them with the lowercase input string. If it finds a match, it sets a flag to true and emits an event with the name of the matched command and the whole input string as arguments; otherwise, If no match exists, it prints a message to the console saying, “Sorry, try again”.
The first part of the document defines how to route each string to the correct function:
e.on('man', function(str) {
  cli.responders.help();
});

e.on('help', function(str) {
  cli.responders.help();
});

e.on('exit', function(str) {
  cli.responders.exit();
});

e.on('stats', function(str) {
  cli.responders.stats();
});
Formatting
You’d also need to create some methods to format the layout of our messages properly so that you can handle table-formatted inputs, for instance. To do that, we defined the following:
cli.verticalSpace: This function takes a number as an argument and prints many empty lines to the console. If the argument is not a positive number, it defaults to 1. This function creates some space between different sections of the output.cli.horizontalLine: This function takes no arguments and prints a horizontal line of dashes across the screen. It uses the process.stdout.columns property to get the screen’s width and creates a string of dashes accordingly. This function creates a visual separator between different sections of the output.cli.centered: This function takes a string as an argument and prints it to the console with padding on both sides to appear centred on the screen. It uses the process.stdout.columns property to get the screen’s width and calculates how many spaces are needed on the left side of the string. It then creates a string of spaces and concatenates it with the original string. This function is used to create a title or a heading for the output.
CLI Command definitions
The commands available are the following:
cli.responders.help: This command displays a help page for the CLI application by listing various commands available in the CLI along with their explanations.cli.responders.exit: This command terminates the CLI and exits the application.cli.responders.stats: This command provides system statistics, including load average, CPU count, free memory, heap memory usage, and uptime.cli.responders.listUsers: This command lists all the registered users in the system, displaying their names, phone numbers, and the number of associated checks.cli.responders.moreUserInfo: This command displays detailed information about a specific user, excluding the hashed password.cli.responders.listChecks: This command lists all the active checks in the system, including their state, with optional filtering based on the provided state.cli.responders.moreCheckInfo: This command displays detailed information about a specific check.cli.responders.listLogs: This command lists all the available log files that can be read.cli.responders.moreLogInfo: This command displays detailed information from a specific log file, including its decompressed content.
Now time for the Masterclass!
We have seen what a CLI is, what is a Node.js CLI, and how to build our own, and we finally closed the cycle of Node.js server development. If you liked the articles, I suggest you take the Skillshare class, where I have taken all the inspiration and code for the pieces.
Thank Pirple.com again for sharing the knowledge!

Leave a Reply